![]() Click
Click ![]() .
.
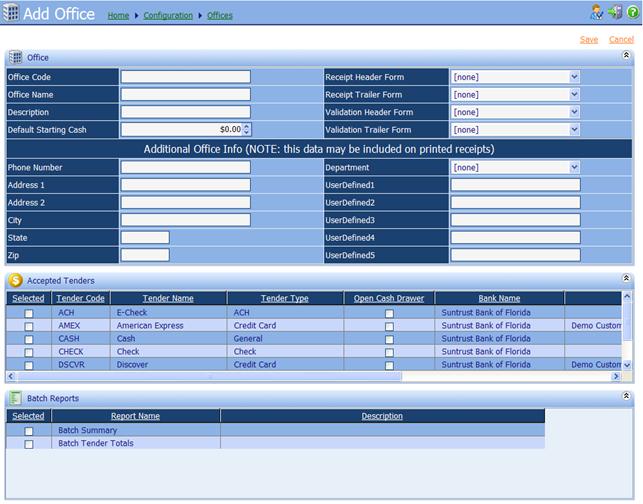
The following page will be
displayed.

∑
Office Code: An alphanumeric identifier
for the Office, unique to iNovah.
∑
Office Name: Name of the particular Office.
∑
Description: A description of the Office.
∑
Default Starting Cash: Default amount shown as
starting cash for cashiers working from this Office.
∑
Receipt Header Form: Form to use at the Office Receipt
level. (see Form Editor Guide)
∑
Receipt Trailer From: Form to use at the Office
Receipt trailer Form. (see From Editor Guide)
∑
Validation Header Form: Form used at the Office
header lever on the Validation Form. (see From Editor Guide)
∑
Validation Trailer From: The Form used at the Office
trailer level on the Validation Form. (See Form Editor Guide)
Additional Office Info (![]() this data may be included on printed
receipts)
this data may be included on printed
receipts)
Any information that is listed here can appear on a
receipt.† Example: if the address, city,
state, and zip code for each office is listed, a Receipt Header Form for each
office can be created and the fields for the address, city, state, and zip can
be arranged on that receipt.† Now, when
the Office header is set for the receipt, then the Address will print on the
receipt.
Accepted Tenders
∑
Selected: All Tenders that the Office
is allowed to collect must be checked.†
This is in addition to assigning the Tender to a Payment Type.
∑
Open Cash Drawer: If checked, When the Tender
is used, the Cash Drawer will open.
∑
Bank Name: Select the bank in which the
Tender will be deposited.
∑
CC Processor Name: Select the Credit Card
Processor that the Credit Card Tender will utilize. (Not applicable for all
environments)
∑
ACH Merchant Name: Select the ACH Merchant
that the ACH tender(s) will utilize. (Not applicable for all environments)
Batch Reports
Select the Batch reports to be displayed for the
office.
![]() Once all needed
information has been entered correctly, Save and Deploy.
Once all needed
information has been entered correctly, Save and Deploy.
Related Topics
Remittance Configuration - Offices