![]() Under the Batch
heading, complete all Import Options.
Under the Batch
heading, complete all Import Options.
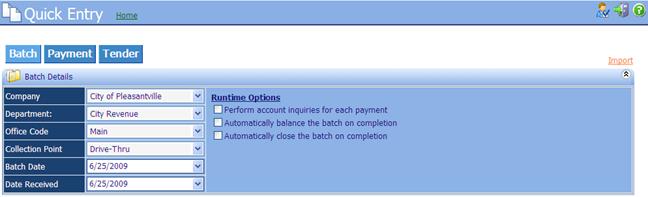
·
Company: iNovah Company to be
associated with this Import.
·
Department: iNovah Department to be
associated with this Import.
·
Office Code: iNovah Office Code to be
associated with this Import.
·
Collection Point: iNovah Collection Point to
be associated with this Import.
·
Batch Date: The Batch Date to be
associated with this Import.
·
Date Received: The Date Received to be
associated with this Import.
Runtime
Options
·
Perform Account inquiries
for each payment: If checked inquires will be performed on the Account numbers from the
Imported File.
·
Automatically balance the
batch on completion: If checked the created Batch will be balanced automatically.
·
Automatically close the
batch on completion: If checked the created Batch will be Closed automatically.
![]() Under the Payment
heading, Complete all Import Options.
Under the Payment
heading, Complete all Import Options.
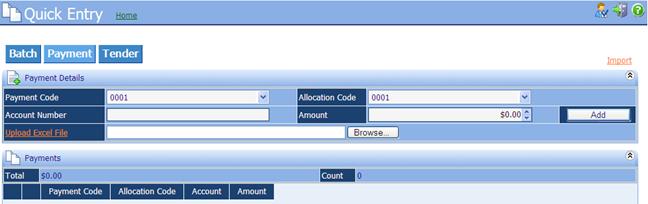
·
Payment Code: The Payment Code.
·
Allocation Code: The Allocations Code.
·
Account Number: The Payment Account Number.
·
Amount: The Payment Allocation Amount.
·
Upload
Excel File:
An Excel XML file specifically formatted so that information can be entered
into the Excel file, and then Imported.
Use the Browse button to navigate to the location of the Excel XML file.
Please contact System Innovators for Excel file if needed.
![]() Once the Payment
Code, Allocation Code, Account Number, and Amount have been entered, Click
Once the Payment
Code, Allocation Code, Account Number, and Amount have been entered, Click ![]() .
.
The
Payment will be visible under the Payments
heading. The Total of all payments will be listed, along with the total Count
of all payments.

![]() Multiple payment
types along with multiple Allocations can be used. Only one can be added at a time.
Multiple payment
types along with multiple Allocations can be used. Only one can be added at a time.
![]() Under the Tender
heading, complete all Import Options.
Under the Tender
heading, complete all Import Options.

·
Tender Code: Choose the Tender Type.
(Only once Tender can be chosen and Change is not issued.)
·
Amount: Auto populated amount of
all Payments.
![]() Once all Import
information is correct, Click Import.
Once all Import
information is correct, Click Import.
Related Topics