![]() Click
Click ![]() .
.
![]() Complete all Export Information for Step
1.
Complete all Export Information for Step
1.
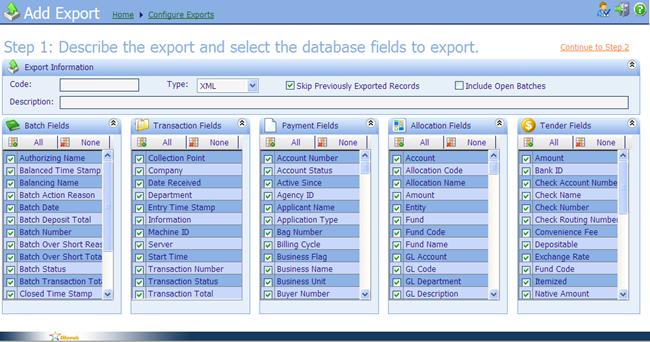
Export Information: Information concerning the
Export
·
Code: Export Code. Appears as the Export Name.
·
Description: A description of the Export
to help users understand it’s purpose.
·
Type: They type of file that will
be Exported. May include custom file
types.
·
Skip Previously Exported
Records:
If checked will skip all payment records that had been Exported. If unchecked, will Export all payment
records, even payment records that may have been Exported before.
·
Include Open Batches: If checked will include
Open Batches.
Batch Fields: A listing of all Batch
fields. If checked, the information
contained in that field will be Exported.
Transaction Fields: A listing of all
Transaction fields. If checked, the
information contained in that field will be Exported.
Payment Fields: A listing of all Payment fields. If checked, the information contained in that
field will be Exported.
Allocation Fields: A listing of all Allocation
fields. If checked, the information
contained in that field will be Exported.
Tender Fields: A listing of all Tender
fields. If checked, the information
contained in that field will be Exported.
![]() Once all Import
information is correct, Click Continue to Step 2.
Once all Import
information is correct, Click Continue to Step 2.
![]() Complete all Export Information for Step
2.
Complete all Export Information for Step
2.
The following page will
appear.
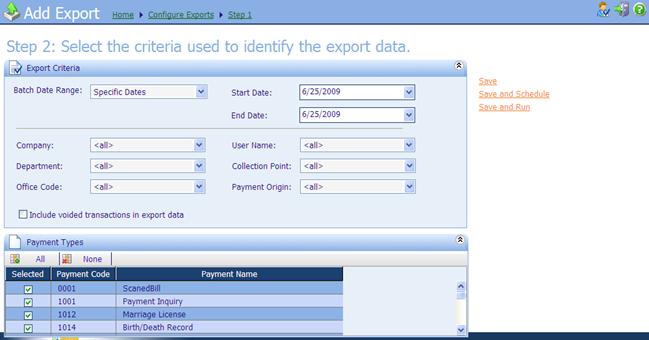
Export Criteria: Information to filter the
information that will be Exported.
·
Batch Date
Range: a
user is able to select Payment Batch Dates.
The date can be chosen either by a Date
Range, or Specific Date.
o Date Range : The range of dates that include, Today, This
Week, This
Month, This
Quarter,
This Year, Yesterday, Last Week, Last
Month, Last
Weekday.
o Specific Date: If Specific Date is chosen, then a Start Date and an End Date can be
configured.
§ Start
Date:
The Batch date to Start Exporting Payment information.
§ End
Date:
The Batch date to End Exporting Payment information.
·
Company: A listing of all available Companies. All or one specific Company can be chosen.
·
Department: A listing of all available Departments. All or one specific Department can be chosen.
·
Office Code: A listing of all available Offices. All or one specific Office can be chosen.
·
User Name: A listing of all available Batch Owners. All or one specific Batch Owner can be chosen.
·
Collection Point: A listing of all available Collection Points. All or one specific Collection Point can be chosen.
·
Payment Code: A listing of all available Payment Codes. All or one specific Payment Code can be chosen.
·
Included voided transactions
in export data: If checked will included Void and Voiding Payment information. All Exports included Valid Payment
information.
Payment Types: A listing of all Payment
Types. Only the Selected Payment Types
will be Exported.
![]() Once all Import
information is correct, Click Save.
Once all Import
information is correct, Click Save.
(Options from
this page)
|
Save |
Will
save the Export to be ran at a later time. |
|
Save and
Set Security |
Will
save the Export and take the user to the Set Security page. Note: Security can be set at any point, not
just when creating the Export. |
|
Save and
Run |
Will
save the Export and Run the Export. |
Related Topics